Showing posts with label Pie. Show all posts

Tuesday, December 3, 2013

Homemade Pumpkin Pie


A little while ago we used our home-grown pumpkins to make pumpkin puree.  I stored it in the freezer in 1 cup increments and made homemade pumpkin pie this Thanksgiving.  Pumpkin pie is good from the can...one of the few things that really is tasty that way.  This pie surpassed all other pumpkin pies I have ever had.  I loved that the recipe required brown sugar instead of just sugar.  That is what made the flavor so unique and so much better than any other pumpkin pie I have ever had.
This is a pie you will not regret making!!

This recipe serves 6-8.


Pie crust (homemade recipe here)
2 C homemade pumpkin puree (how-to found here)
2 1/2 tsp pumpkin pie spice (homemade recipe here)
2 eggs
1 C brown sugar, packed
1 TBSP all-purpose flour
1/2 tsp salt
1 can (12 fl. oz.) evaporated milk

Preheat the oven to 425.
Prepare the crust in a 9" pie dish.
In a large bowl, combine the pumpkin puree, pumpkin pie spice, eggs, brown sugar, flour, and salt.
Gradually stir in the evaporated milk until smooth and creamy.
Pour the filling into the pie crust.
Bake for 15 minutes.  Do not open the oven or remove the pie.
Turn the temperature down to 350.  Bake for 35-50 minutes until a knife inserted into the middle of the pie comes out clean.
Remove the pie from the oven.  If you need to refrigerate it, let it cool completely before putting it in the refrigerator or the filling will separate from the sides of the crust.

*This recipe was adapted slightly from allrecipes.com.

Tuesday, October 22, 2013

Fresh Homemade Pumpkin Puree


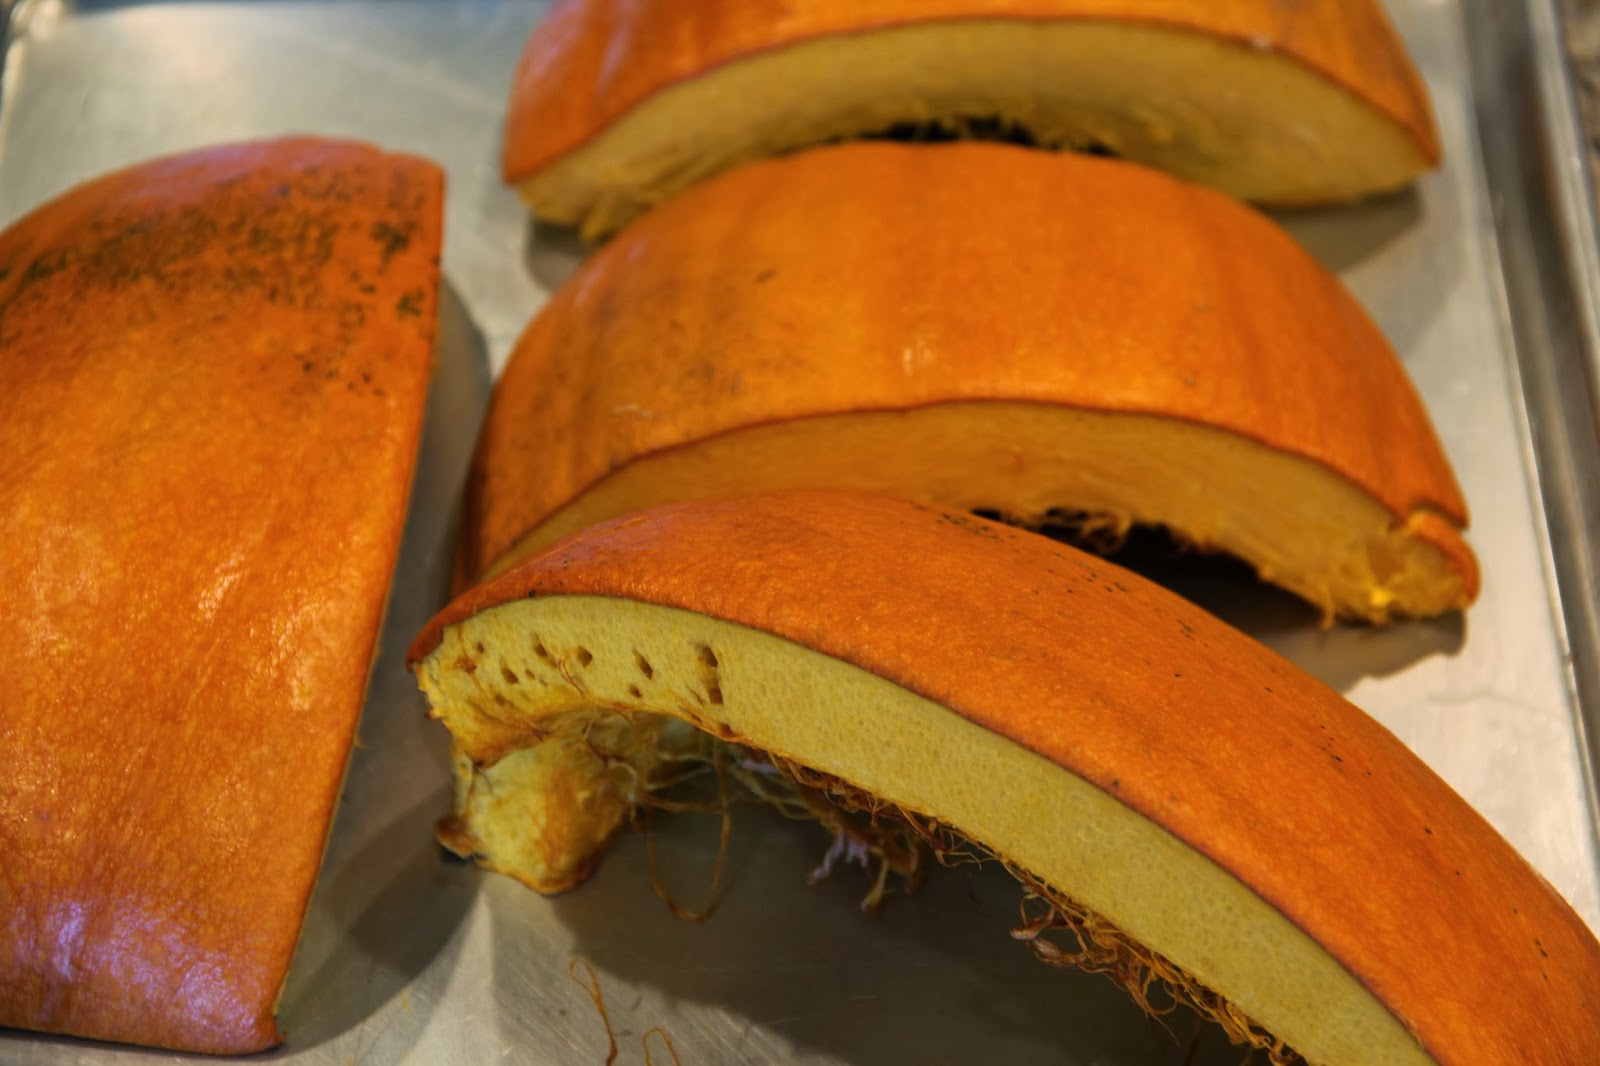
We had an abundance of pumpkins in our garden this year.  We decided to try to make homemade pumpkin puree and keep it in the freezer to have on hand for this upcoming holiday season where pumpkin dishes are made so many times.
The large pumpkin I used yielded 5 cups of pumpkin puree.  The amount you get will completely depend on how large or small your pumpkin(s) is/are.


pumpkin(s) - make as many as you want!

Preheat the oven to 350.
Slice the large pumpkins into smaller chunks easier to handle.
Scrape out all of the pumpkin "guts" (seeds and a majority of the stringy stuff...if you miss some of the stringy stuff, it is no big deal).
Place the pumpkin pieces on a large cookie sheet face up or face down (I put mine face down).


Bake for 45-60 minutes until the pumpkin can be easily pricked with a fork.
Remove the pumpkin from the oven.
Peel/slice the skin and any remaining "stringy stuff" off of the roasted pumpkin.
Put the pumpkin chunks in a food processor or blender and blend until it is smooth (the same as canned pumpkin puree).
You may need to add a few tablespoons of water to the puree while it is blending if the pumpkin is too dry.
Using a fine strainer or cheesecloth, strain the puree for a few minutes and remove any excess water.


Use immediately in a recipe or keep in the refrigerator for 24 hours.
Freeze any remaining puree in 1 C (or any increment you choose) amounts in plastic bags.


This recipe was adapted from multiple sources and my mom.

Monday, December 10, 2012

Mini Pumpkin Pies

On the 10th day of Christmas my true love gave to me...mini pies!


These little pies are so cute and a fun way to make a bite-sized dessert.  They are actually quite simple as well.  I made mini muffin size and regular muffin size.  Totally depends on how "bite-sized" you want them to be.  I used canned pumpkin pie puree and followed the directions on the back to make the filling.  With only a double pie crust, I only used about half of the filling.  If you want to use it all, double the crust (so you have enough crust for four total pies).

Favorite pie crust (enough for two regular pumpkin pies...you can also just purchase two pie crusts and let them thaw before rolling them out a little thinner)
Pumpkin pie filling (I just followed the directions on the can)
Whipped cream (optional)

Preheat the oven to 350.
Roll out the pie crust until about 1/8-1/4" thick (it will be thinner than regular pie crust).
Using a round cookie or biscuit cutter, make circles the right size for your muffin tins (they should be about 1/2" wider than the opening of each muffin hole).
Shape each circle of dough into the muffin holes so that it comes all the way to the top (it can come higher if you want and you could make a decorative edge - I was not that creative this time around).
Fill each mini pie about 3/4 of the way full with filling.
Bake the mini muffin size for about 20-25 minutes and the regular muffin size pies for about 28-32 minutes (this will totally depend on your oven (make sure to check them - they are done when a toothpick comes out clean).
Let them cool for about 5 minutes in the pan and then remove to finish cooling on a wire rack.
Serve with a dollop of whipped cream on top if you would like!

Friday, August 24, 2012

Strawberry Rhubarb Pie

This is my dad's favorite pie and one I remember actually not liking as a kid.  When my parents came out for a visit around his birthday, I made a strawberry rhubarb pie for my dad.  I am so glad tastes change over the years - this was amazing!
I made some changes to my mom's pie recipe and was very happy with the results.  My husband was so happy with them, he requested a second one the next day...and he got his own pie as a result!


Double pie crust

1 C sugar
1/3 C flour
3 TBSP cornstarch
1/4 C brown sugar
2 C rhubarb, chopped into small pieces
2 1/2 C strawberries, sliced
egg white
sugar (for sprinkling)

Preheat the oven to 425.
Roll out 1 pie crust and place in an 8-9" pie pan.
Mix the sugar, flour, and cornstarch.
Add the strawberries and rhubarb and coat with the sugar/flour/cornstarch mixture.
Add brown sugar.
Pour into the pie crust.
Top the filling with the second crust (I used a lattice pattern.  You can roll it out and place it on top, just make sure you put 3-5 slits in the top to allow for steam escape.  Feel free to experiment with fun patterns!)
Brush the top crust with the egg white.
Sprinkle with sugar.
Bake for 40-50 minutes until the crust is golden brown and the juices boil.
Let the pie cool and set.  If it does not cool long enough, the filling will not be set.  It is still delicious, just harder to serve.
Strawberry rhubarb pie is especially delicious with vanilla ice cream!

*This recipe was adapted from my mom's original recipe.

Thursday, June 28, 2012

Lemon Meringue Pie


My sister is staying with us for a little while and surprised us with this delicious pie for dessert one night!

(please ignore the fact that in the picture about the meringue was in the process of sliding off the filling...)

1 prepared pie crust

Lemon Filling:
1 1/4C sugar
1/3 C cornstarch
1 1/2 C water
4 large egg yolks, lightly beaten (save egg whites for meringue)
1/2 C lemon juice
1 TBSP grated lemon zest
2 TBSP butter 

Meringue Topping:
4 large egg whites, at room temperature
1/4 tsp cream of tartar
1/4 tsp salt
1/2 tsp vanilla
1 C sugar 


Crust preparation:
Roll the prepared pie crust into an 11" circle on a lightly floured surface.
Place in the pie pan with about 1" of dough over hanging around the rim.
Fold and crimp the edges of the dough to make a thicker, "prettier" rim of crust.
Prick the crust multiple times all over with a fork and put it in the freezer for 30 minutes.
Preheat the oven to 400.
Spread a sheet of aluminum foil inside the pie crust and be sure to cover the rim of the crust.
Fill the fill about halfway with rice or dried beans and bake for 15-20 until the crust has set. 
Reduce the oven heat to 350 (while the pie crust is still in the oven) and remove the foil.
Bake the pie crust for about 8 more minutes until it is golden brown and then remove it from the oven.


Filling:
In a large saucepan, combine the sugar, cornstarch, and water.
Stir until the cornstarch is dissolved and then cook on low heat until the mixture thickens - keep stirring the entire time!
Whisk in the egg yolks and continue stirring while the mixture thickens and eventually begins to bubble.
Remove the pan from the heat and stir in the lemon juice, lemon zest, and butter.


Meringue:
Beat the egg whites, cream of tartar, salt, and vanilla until a fluffy mound is formed.
Beat on medium speed while adding the sugar gradually.
When all the sugar is added, increase the speed to medium high and continue beating the mixture until it is stiff and glossy but not dry.


Put it all together:
Preheat the oven to 350.
Pour the filling into the pie crust.
Gently spread the meringue all the way to the edges over the filling - you can give it the "peaked" look by swirling it with a spoon back.
Put in the oven and bake for about 15 minutes until the meringue peaks start to brown.
Cool before serving to let the filling set.
We prefer the pie chilled in the refrigerator prior to serving!


*My sister found the filling and meringue recipe in The Unofficial Harry Potter Cookbook.

Sunday, April 29, 2012

Boston Cream Pie


Boston Cream Pie is one of my all time favorite desserts.  When my sister requested it for her birthday dessert, my husband informed me that in 4 years of marriage, I had never made him a Boston Cream Pie.  Good thing that changed!  This dessert has a cake base with a custard filling and delicious but not too sweet chocolate glaze.

Cake:
1 1/4 C flour
1 C sugar
1 1/2 tsp baking powder
1/2 tsp salt
3/4 C milk
1/3 C shortening
1 egg
1 tsp vanilla

Preheat oven to 350.
Put all ingredients in a bowl and beat with a hand mixer on low for 30 seconds and high for 3 minutes.
Pour into a greased and floured pan (9" round cake pan).
Bake for 30-35 minutes until cake is cooked through (test it with a toothpick).
Let the cake cool for about 10 minutes in the pan and then remove the cake and place it on a wire cooling rack.
Let the cake cool completely.
Slice the cake in half horizontally (I make a small indentation around the circumference of the cake with a serrated knife and then use floss to cut the cake through).

Cream Filling:
1/3 C sugar
2 TBSP cornstarch
1/8 tsp salt
1 1/2 C milk
2 egg yolks

Mix and heat sugar, cornstarch, salt, and milk in a saucepan on medium heat until the mixture thickens and boils.
Boil and stir the mixture for 1 minute.
Stir 2 egg yolks in a mixing bowl.
Slowly add the heated mixture to the bowl while stirring.
Pout the mixture back into the pan and bring it to a boil on medium heat.
Boil for 1 minute and remove from heat.
Let the mixture sit and thicken.

Chocolate Glaze:
2 squares unsweetened chocolate
3 TBSP butter
1 tsp vanilla
1 C powdered sugar
2 TBSP hot water

Melt the chocolate, butter, and vanilla in a small saucepan.
Remove from heat and add the powdered sugar and hot water and mix until a glaze consistency is reached.

Place 1 half of the cake on a cake pedestal or flat serving surface.
Layer with the cream filling.
Cover with the second cake layer.
Drizzle with the chocolate glaze.
Serve warm or after refrigerating.

LinkWithin

Related Posts with Thumbnails